Build your own ADS-B receiver today!
ADS-B Exchange offers a custom Pi feeder image with stats, maps, US sectionals, and a wifi-based configuration interface. It is configured to eliminate SD card writes. The image is a true setup with no updates needed. It comes as a software image that you burn onto an SD card and boot the Raspberry Pi from. The goal is, “it just works.”
If you want to build a feeder that can stay active in harsh conditions and needs minimal maintenance, then the ADSBx feeder image is a good place to start.
Step 1: Obtain the necessary hardware – See Hardware Page for a more detailed discussion of suggested DIY hardware along with Amazon links to buy the hardware. Alternately you can buy our DIY kit Here.
Hardware is available from https://adsb.store, Amazon, ebay, or other online electronics vendors. Minimum to get started is a Raspberry Pi (3, 4, or Zero 2W) and ADSBx 1090 kit. If possible, use an official Raspberry Pi power supply. Note that the Raspberry Pi 5 is not necessary, and does involve a few more setup steps than the Pi 4B. If you wish to use a Pi 5, follow these steps.
Step 2: Download the file below and save it on your computer.
Latest Release:
https://downloads.adsbexchange.com/downloads/adsbx-9.0.240503.zip
md5sums:
d4aa38cd5f8ea4f9bf5a25466e89aa59 adsbx-9.0.040503.img
7ec532dec7f47b75de996f3a7f6ed340 adsbx-9.0.240503.zip
Previous Release:
https://downloads.adsbexchange.com/downloads/adsbx-8.2.220910.zip
md5sums:
906eb981388976f77f745f4cc94e94c6 adsbx-8.2.220910.img
5a5b82e7645ed0884beb29a969cab80a adsbx-8.2.220910.zip
Updates:
- Based on “Bookworm” OS – natively compatible with the Pi 5, as well as Pi 4, Zero 2W, and probably Pi 3 (although that is currently untested)
- Supports USB GPSes (ie: https://www.amazon.com/gp/product/B07GJGSZB9) – simply plug in the GPS and once it receives a good position, it will set the proper GPS coordinates/altitude of your position in the configs, and restart services. If it detects you are moving, it will disable MLAT while moving, and re-enable with new position once sitting still.
- Enhanced remote access for support (if enabled by the user).

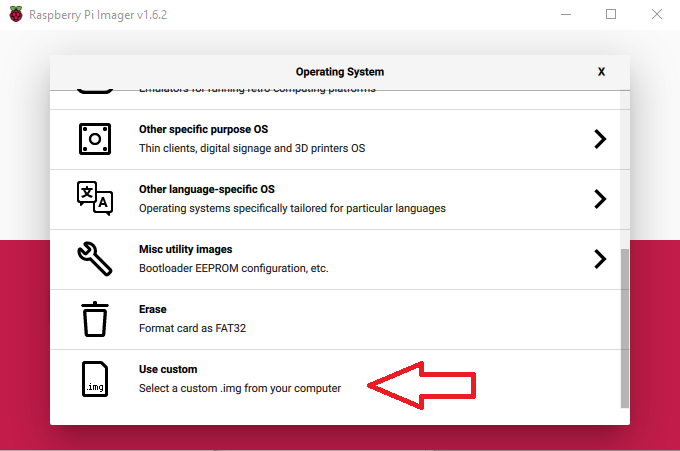
Step 3: After downloading the file above, write it to a MicroSD card. Recommended software for this is “Raspberry Pi Imager”. Under “Operating System”, choose “Use Custom” and pick the image file you downloaded above.
Step 4: Insert SD card into Pi, connect all hardware and allow the Pi to boot up. On first boot, filesystem is expanded to fill the entire SD card. This may take up to 5 mins depending on the size of your SD card. Do not interrupt this process. Subsequent boots should take approximately 60 seconds (based on Pi 4 performance).
Note: If you intend to use an Ethernet Cable for your Pi’s network connection, skip ahead to Step 5.
Step 5: Once Pi has booted, you will see a WiFi network called “ADSBx-config”. Join this network using your smartphone or computer. Since the Pi does not yet have an internet connection, you will likely need to tell your smartphone to “stay connected” (android), or “keep using wifi” (iOS).
The “ADSBx-config” network only exists for 15 minutes after boot (if the pi has no internet connectivity) for security reasons. If it still has no network connection after that, it shuts down. Power-cycling the Pi will reactivate it.
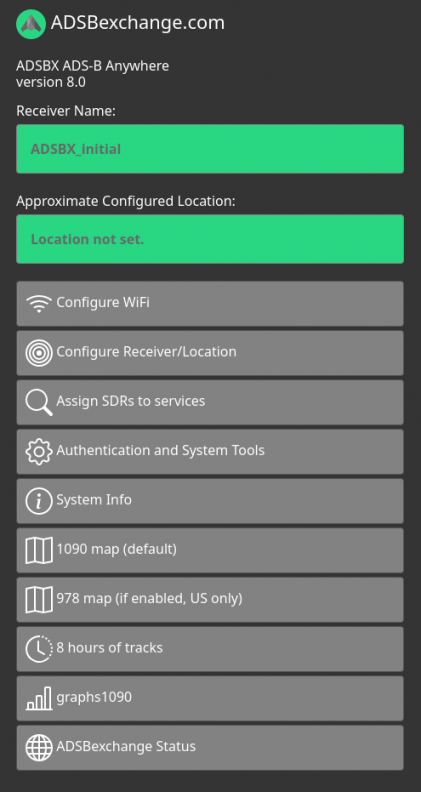
Step 6: Once connected to the wireless network named “ADSBx-config”, using a web browser, open: http://adsbexchange.local. Click on “WiFi Setup”, select your network and input your password. The device will reboot and connect to the configured wifi.

Step 7: Assuming the configuration is correct the Pi will connect to your WiFi. You can now access the feeder over your LAN / WiFi by going to: http://adsbexchange.local
Step 8: Visit http://adsbexchange.local. Choose “Configure receiver/Location” to configure GPS location and other feeder parameters. Click “Save and Reboot”
Note: To find your lat/lon coordinates, and mean sea level (MSL) altitude in your area, you can use the site linked on the config page, https://www.freemaptools.com/elevation-finder.htm.
One option, “Use Custom LED indications” can re-purpose the LED lights on your pi:
- Green LED – blink frequency proportional to # of aircraft with position being received.
- Red LED, number of blinks:
1 blink – Zero planes with position detected
2 blinks – Receiver location not set, or 978 UAT service enabled but not running
3 blinks – Readsb service failed
4 blinks – No connection to ADS-B Exchange servers
5 blinks – CPU Temperature and/or power supply voltage failure
Step 9: Verify your feeder is connected and sending data to ADS-B Exchange by going to https://www.adsbexchange.com/myip (bottom link on your feeder’s menu). If everything is working as expected, you will see two green smiley faces.
Step 10: Adding Optional 978 UAT: This is for United States only, other countries do not have 978. If you are using a second SDR for the 978 UAT frequency in the US, choose the “assign SDRs to services” option to ensure the correct SDR is used by the correct software.
Feel free to report any issues you encounter with this script using the forums or contact ADSBx here.
That’s it, your traffic should appear on the Global Radar Page after sending data for an hour. (sometimes this can take longer)
Web UI / SSH Password:
- You can change the default password for your pi using the “Change password” option in the web interface menu.
- The initial / default password is “adsb123”.
- Changing the password in the web interface will also change the password for SSH access using the user “pi”.
- Changing the password for the user “pi” will also change the password for the web interface.
SSH access:
The image ships with SSH already enabled (contrary to the images available from raspbberypi.com). To login use the username “pi” and default or changed password (see above).
This image is based on Raspbian Lite. Thus you can install most other software with some exceptions: Software like pihole and some other software suites which take over the web interface are not compatible.
Go to command line information.
